|
| Easy Homemade Granola Bars: A Beginner's Guide |
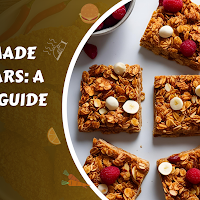
Introduction to Homemade Granola Bars
Creating easy homemade granola bars is a rewarding experience that combines simplicity, flavor, and nutrition. Whether you are a beginner in the kitchen or a seasoned cook seeking a healthier snack option, crafting your own granola bars offers control over ingredients, ensuring a nutrient-rich, preservative-free treat. In this guide, we will delve deeply into the process, ingredients, tips, and storage methods for making perfect granola bars that rival any store-bought alternative.
Why Choose Homemade Over Store-Bought?
Homemade granola bars are free from artificial preservatives, excess sugar, and synthetic flavors. By making them yourself, you can:
-
Customize ingredients to suit dietary needs and preferences
-
Ensure freshness and eliminate stale or processed components
-
Control sugar levels for a healthier lifestyle
-
Save money over time
Essential Equipment for Making Granola Bars
Before beginning, ensure you have the following tools:
-
Large mixing bowl
-
Measuring cups and spoons
-
Rubber spatula
-
Baking sheet or 8x8-inch square pan
-
Parchment paper
-
Sharp knife for slicing
These basic utensils ensure a smooth, efficient granola bar preparation process.
Core Ingredients for Beginner-Friendly Granola Bars
A great granola bar starts with a solid foundational mixture. Here are the essential components:
1. Rolled Oats
Use old-fashioned rolled oats for optimal texture. Avoid quick oats, which can become mushy, and steel-cut oats, which are too coarse and undercooked.
2. Nut Butter
Nut butters serve as a binding agent and flavor enhancer. Popular options include:
-
Peanut butter
-
Almond butter
-
Cashew butter
Ensure it's natural and unsweetened to avoid unnecessary sugars.
3. Sweeteners
Natural sweeteners offer a pleasant taste and help bind the bars:
-
Honey – Ideal for chewy texture
-
Maple syrup – Offers a rich, earthy sweetness
-
Brown rice syrup – Great for firm bars
4. Mix-ins and Add-ins
This is where creativity shines. Consider including:
-
Nuts: Almonds, walnuts, pecans
-
Seeds: Chia, flaxseed, sunflower seeds
-
Dried fruit: Cranberries, raisins, apricots
-
Chocolate chips: Dark, semi-sweet, or white
-
Coconut flakes, protein powder, or spices like cinnamon or nutmeg
5. Flavor Enhancers
-
Vanilla extract
-
Pinch of sea salt
Step-by-Step Instructions for Making Granola Bars
Step 1: Prepare the Base
In a large bowl, combine:
-
2 cups rolled oats
-
1 cup chopped nuts
-
½ cup seeds (optional)
-
¼ teaspoon sea salt
-
½ teaspoon cinnamon
Mix thoroughly for even distribution.
Step 2: Melt and Mix the Binders
In a small saucepan over medium heat, melt:
-
½ cup honey (or maple syrup)
-
½ cup natural peanut butter
-
1 teaspoon vanilla extract
Stir constantly until smooth and warm.
Step 3: Combine Wet and Dry Ingredients
Pour the heated mixture over the dry ingredients. Use a rubber spatula to stir until everything is evenly coated.
Step 4: Add Extras
Once the mixture has cooled slightly, fold in:
-
½ cup dried fruit
-
¼ cup chocolate chips (optional, add after cooling)
Step 5: Press into a Pan
Line an 8x8-inch pan with parchment paper. Press the mixture firmly into the pan using:
-
A spatula
-
The back of a spoon
-
Another piece of parchment paper
Ensure it’s packed tightly for solid bars.
Step 6: Chill and Slice
Refrigerate for at least 2 hours. Once set, remove from the pan and slice into bars using a sharp knife. For clean edges, wipe the knife between cuts.
Storage Tips to Maximize Freshness
To maintain optimal texture and flavor:
-
Refrigerate: Store in an airtight container for up to 2 weeks.
-
Freeze: Wrap individually and freeze for up to 3 months.
-
Room temperature: Lasts up to 1 week if kept cool and dry.
Granola Bar Flavor Variations
Explore different combinations to keep your snacks exciting:
Peanut Butter Chocolate Chip Bars
-
Rolled oats
-
Peanut butter
-
Honey
-
Dark chocolate chips
-
Crushed peanuts
Tropical Delight
-
Rolled oats
-
Coconut flakes
-
Dried pineapple
-
Macadamia nuts
-
Maple syrup
Autumn Spice Bars
-
Rolled oats
-
Chopped pecans
-
Dried cranberries
-
Pumpkin spice
-
Honey
Protein-Packed Energy Bars
-
Rolled oats
-
Almond butter
-
Chia seeds
-
Protein powder
-
Maple syrup
Troubleshooting Common Issues
Bars Are Too Crumbly
-
Not enough binder (add more honey or nut butter)
-
Not pressed firmly enough into the pan
Bars Too Sticky
-
Too much syrup
-
Not chilled long enough
Bars Fall Apart After Cutting
-
Let bars set longer in the fridge
-
Use parchment paper to compress more evenly
Nutritional Benefits of Homemade Granola Bars
Crafted thoughtfully, these bars offer:
-
High fiber content from oats and seeds
-
Healthy fats from nuts and nut butters
-
Natural sugars from fruits and honey
-
Protein to sustain energy levels
Ideal for breakfast, pre- or post-workout snacks, and midday energy boosts.
Making Granola Bars Kid-Friendly
Children love chewy granola bars with sweet and colorful additions. For kid-approved bars:
-
Use mini chocolate chips
-
Include chopped dried strawberries
-
Add natural sprinkles
-
Cut into fun shapes using cookie cutters
Avoid whole nuts if there's a choking hazard and ensure all ingredients are age-appropriate.
Gluten-Free and Vegan Options
Gluten-Free
-
Use certified gluten-free oats
-
Ensure mix-ins are gluten-free
Vegan
-
Replace honey with maple syrup or agave
-
Use vegan chocolate chips
Batch Preparation and Meal Prepping Tips
Maximize your time and effort by:
-
Doubling recipes and freezing extras
-
Pre-portioning for the week in small containers
-
Labeling flavors and dates for easy identification
Batch-making granola bars ensures you always have a healthy snack on hand.
Advanced Tips for Perfecting Your Bars
Toast the Oats
Briefly toasting the oats (10 minutes at 350°F) enhances flavor and reduces moisture, resulting in a more satisfying crunch.
Use a Food Processor
Pulse oats or nuts for a finer texture if you prefer less chunkiness.
Try Layered Bars
Add a bottom layer of nut butter or melted chocolate and let set before adding the oat mixture for a gourmet touch.
Granola Bars as Gifts or Party Favors
Beautifully packaged granola bars make thoughtful and healthy gifts. Wrap them in:
-
Wax paper and twine
-
Decorative foil
-
Custom printed labels
Perfect for holidays, birthdays, or corporate wellness events.
Sustainability and Homemade Snacks
Making your own snacks reduces packaging waste, supports local ingredients, and encourages mindful eating habits. Consider sourcing from:
-
Local farmers’ markets
-
Bulk food stores
-
Organic co-ops
Conclusion: Embrace the Art of Homemade Granola Bars
Crafting easy homemade granola bars is more than a culinary project—it’s a lifestyle choice that empowers you to eat healthier, reduce waste, and savor fresh, personalized flavors. With endless combinations, adaptable recipes, and detailed techniques outlined in this guide, we invite you to make granola bars a staple in your kitchen. Begin experimenting today and enjoy the satisfaction of a snack made entirely by your hands.